
Jeffersons of Anarchy
Jeffersons of Anarchy
Fooseball A New Saga
Want a Spicier Take? Need a Little Encouragement? Try Changing the Tone of your Report!

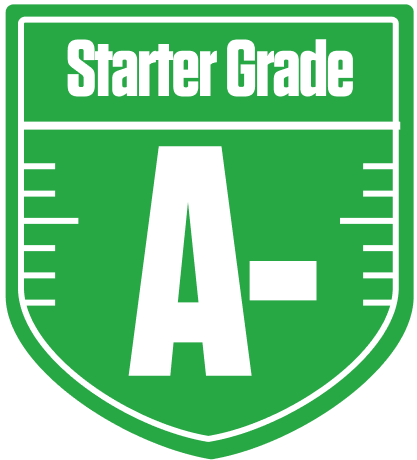
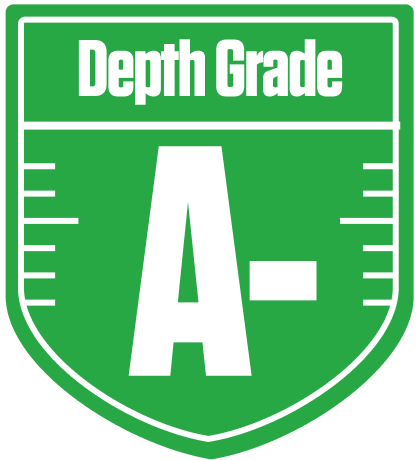
Your Draft Report Card Is Here, Jeffersons of Anarchy - Let's Break Down How You Did
Well now, the Jeffersons of Anarchy have put together a solid redraft squad in the Fooseball A New Saga league, earning themselves a respectable overall grade of A-. This team’s draft results show a strong balance, especially in the running back and tight end groups, which are graded highly and project to deliver consistent points. The league’s full PPR scoring and defensive individual player slots add some spice, and JOA’s roster construction takes good advantage of that with standout linebackers and safeties.
That said, the quarterback and defensive line positions are clear trouble spots, dragging down the overall defensive grades and potentially limiting ceiling in key matchups. With playoff chances hovering around the mid-60s percentile, this team is in a good spot but will need some strategic moves to push into the great category. Let’s dive deeper into where the Jeffersons shine, where they stumble, and how they can leverage Footballguys tools to maximize their chances of fantasy glory this season.
Your Grades By Position
Quarterback


Running Back
Wide Receiver

Tight End

Kicker

Linebacker

Defensive Tackle
Defensive End

Cornerback
Safety


Quarterback
Running Back
Wide Receiver
Tight End
Kicker
Linebacker
Defensive Tackle
Defensive End
Cornerback
Safety
Playoff Chances
{"type":"doughnut","data":{"labels":["Make the Playoffs","Miss the Playoffs","Make the Playoffs","Miss the Playoffs","Make the Playoffs","Miss the Playoffs"],"datasets":[{"label":"Great Management","data":[75,25],"backgroundColor":["#3b82f6","#6c757d"],"borderWidth":3,"borderColor":"#fff"},{"label":"Good Management","data":[67,33],"backgroundColor":["#22c55e","#6c757d"],"borderWidth":3,"borderColor":"#fff"},{"label":"Average Management","data":[57,43],"backgroundColor":["#fbbf24","#6c757d"],"borderWidth":3,"borderColor":"#fff"}]},"options":{"responsive":true,"maintainAspectRatio":false,"backgroundColor":"transparent","cutout":"40%","plugins":{"legend":{"display":false},"tooltip":{"enabled":true,"backgroundColor":"rgba(0,0,0,0.8)","titleColor":"#fff","bodyColor":"#fff"}},"elements":{"arc":{"borderWidth":3,"borderColor":"#fff"}}}}
Position Upside Potential
Breakout potential by position - more stars indicate greater upside opportunity