
CaptainCrunchyy
CaptainCrunchyy
Tigerdroppings 2025
Want a Spicier Take? Need a Little Encouragement? Try Changing the Tone of your Report!


CaptainCrunchyy's Draft Report Card - Tigerdroppings 2025 Breakdown
Well, howdy, CaptainCrunchyy! You’ve put together a strong A- grade team in this 10-team, full PPR redraft league, and that’s no small feat. With a solid starting lineup and a bench that’s respectable if not spectacular, you’re sitting pretty with a playoff chance hovering around 53% on average and up to 73% if things break your way. The league’s standard roster settings with 1 QB, 2 RBs, 2 WRs, 1 TE, and 2 flex spots mean your depth at running back and tight end really shines, while your wide receiver group leaves a bit to be desired.
Your team’s approach leans heavily on a rock-solid running back corps and a top-tier tight end, which is a smart play in this format. But, as you’ll see below, the wide receiver group is your Achilles’ heel, dragging down your overall upside. We’ll also dig into bye week conflicts and some savvy free agent pickups that could help you shore up those weak spots. Let’s dive into the nitty-gritty and see how you can turn this good team into a great one!
Your Grades By Position
Quarterback

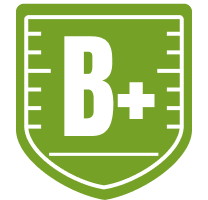
Running Back

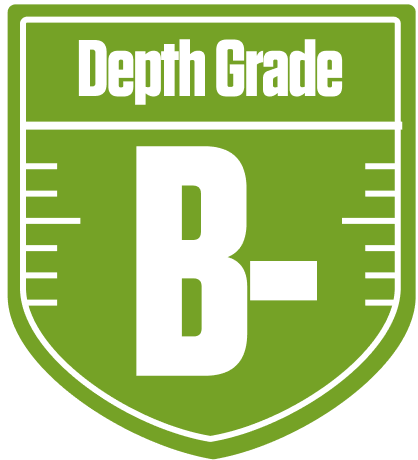
Wide Receiver


Tight End

Team Defense
Kicker

Quarterback
Running Back
Wide Receiver
Tight End
Team Defense
Kicker
Playoff Chances
{"type":"doughnut","data":{"labels":["Make the Playoffs","Miss the Playoffs","Make the Playoffs","Miss the Playoffs","Make the Playoffs","Miss the Playoffs"],"datasets":[{"label":"Great Management","data":[73,27],"backgroundColor":["#3b82f6","#6c757d"],"borderWidth":3,"borderColor":"#fff"},{"label":"Good Management","data":[64,36],"backgroundColor":["#22c55e","#6c757d"],"borderWidth":3,"borderColor":"#fff"},{"label":"Average Management","data":[53,47],"backgroundColor":["#fbbf24","#6c757d"],"borderWidth":3,"borderColor":"#fff"}]},"options":{"responsive":true,"maintainAspectRatio":false,"backgroundColor":"transparent","cutout":"40%","plugins":{"legend":{"display":false},"tooltip":{"enabled":true,"backgroundColor":"rgba(0,0,0,0.8)","titleColor":"#fff","bodyColor":"#fff"}},"elements":{"arc":{"borderWidth":3,"borderColor":"#fff"}}}}
Position Upside Potential
Breakout potential by position - more stars indicate greater upside opportunity